Those just starting off their cheerleading career often find themselves in a very challenging predicament. After teaching cheerleaders tumbling for over 7 years, I saw it way too often. These young aspiring athletes are typically thrust in to a beginning tumbling class, given a pat on the back, and told to go get that back handspring!
While generally enthusiastic and full of energy in this new undertaking, this tends to be a lot of pressure for a young new tumbler. More often than not, they faced a long uphill battle in the quest towards advanced tumbling skills.
Adding to the pressure, many cheerleaders starting out faced a similar dilemma on day one of class.
“Tryouts are in a month and I have to get my back handspring!”
It was always painful for me to hear this because disappointment was usually the outcome after a month.
The road to advanced tumbling for cheerleaders tends to be a very different one from gymnasts. Most cheerleaders, at no fault of their own, are at a distinct disadvantage in their tumbling progression for many reasons.
Primarily it’s due to less time training, and not as much emphasis and focus put on fundamentals, strength and flexibility. This tends to make the journey a much harder one.
Here’s the good news. It can be easier…much easier! But it’s completely up to you to be disciplined enough to do what I’m about to tell you (you can do it!).
Don’t settle for getting the quick, not so pretty back handspring just to get through a tryout. The back handspring leads up to so many other skills – a second consecutive back handspring, a tuck, layout, full, double full.
Starting off with a lousy back handspring will lead you to, well, just that…a lousy back handspring.
The same goes for every other skill and progressing. Bad tucks will never progress to a good layout. Bad layouts will never turn in to a full. And so on.
Remember, there are still cheerleading scholarships to be had out there if you are looking to continue the sport in to college. I assure you, you will make a serious impression if you show up to try outs with some beautiful tumbling.
In fact, I was put on Georgia Tech’s competition squad for that very reason. Someone on the team heard I was a former gymnast and could tumble well. So they put me on the team. I had zero cheerleading skills. None. No dancing, stunting or spirit. Just gymnast quality tumbling.
So, I’m going to lay it out for you. If you want to rock out some sky high double fulls one day, here’s exactly what you need to be doing at home.
At least 3 (preferably 5) nights a week, throw on your Maroon 5, Taylor Swift or whatever gets you motivated 
**Train safely! Use a spotter and proper matting to prevent injury**
1. Strength – Ugh! I know a lot of cheerleaders don’t get excited about the idea of strength training. However, it’s time to warm up to idea because I can’t stress how important it is for your progression as a tumbler. As you develop strength, your fundamentals and more advanced skills will become easier and easier. Shoot for at least 30 mins to 40 mins of strength training. You will notice there will be some overlap with strength and fundamentals. Don’t worry, if you can’t kick to handstand yet, these strength exercises will help.
Get excited! Here is what you need to start doing in your free time at home.
Upper Body Work:
Push Up Hold – Hold yourself at the top of a pushup. Keep your arms straight and squeeze your body. You don’t want to see your shoulder blades so work on pushing up and rounding your body in a slight hollow. Work yourself up to holding this for 2 mins. Do 3 to 5 sets and hold each one as long as possible.
As these start to get easy, increase the difficulty by elevating your legs. For example. Do the same position with your feet propped on the couch (take your shoes off! You’ll upset mom). Again, stay tight through the body and keep a hollow position pushing through the shoulders.
Further increase the difficulty by stacking pillows on the couch under your feet only putting you in more of an inclined position. Stay tight in your abs, again with a round back and hold as long as possible.
Handstands – Developing a perfect handstand will have amazing benefits for your tumbling
Start off in the early stages of strength training by kicking up against a wall. A slightly hollow hand stand should be your goal.
Don’t rush in to each handstand in a sloppy manner. Go in to every handstand by doing the following: Stretch, lunge (hold briefly) and then kick up.
Your back and rear end should be able to touch the wall while you are squeezing your abs.
Squeeze all your muscles!
Keep your fingers pointing towards the wall, arms by ears and your elbows straight.
You should be able to tuck your head in and look at your toes.
Hold them as long as you can, come down, rest, and then do it again. Wear yourself out for about 15 mins.
If you struggle with kicking up against a wall, you can start out facing away from the wall. Place you hands on the floor, and you can walk your feet up the wall until your belly is touching. Be careful in this position because falling forward puts you on hardwood. Ouch!
Don’t get discouraged because working some of the other strength elements I discuss will make this easier through time.
Once you are super comfortable against the wall, bring it out to unassisted handstands. Kick up and hold as long as possible, squeezing the body tight, keeping good form.
Once you can hold a 15 second handstand on your own, do the following for strength training: Hold 5 handstands against a wall for 1 minute at a time. Work your way up to 5 sets of 2 minute holds. Many things will come easy to you once you develop this kind of strength.
Now we are making some progress!
Push Ups – Noooo! I know you are cringing but push ups are great! You will be working shoulders, chest and triceps. Great muscles to develop. Start with 50 per night and work your way up to at least 100. 200 if you are up for it! If you have to use your knees at first, that’s ok.
If you can rep out 50 push ups in a row, you have rock star strength and better tumbling days are ahead!
Chair Dips – Chair what?? Place your hands on the edge of the seat of a chair, supporting your weight, with arms straight and legs straight out in front of you with heels on the floor.
You should be slightly bent in the hips. Dip down by bending your elbows slightly past 90 degrees, then press back up.
Do 3 to 5 sets of 20. As they get easier, prop your legs up on another chair to make them more difficult. If those get easy, start adding weight (a jug of water, your school books etc) in your lap.
Bridge Hold – Used for stretching as well but also a good isometric hold.
Try to work yourself up to holding a bridge for 2 mins. Do at least 3 sets of this hold. More details on the bridge below.
Core Strength:
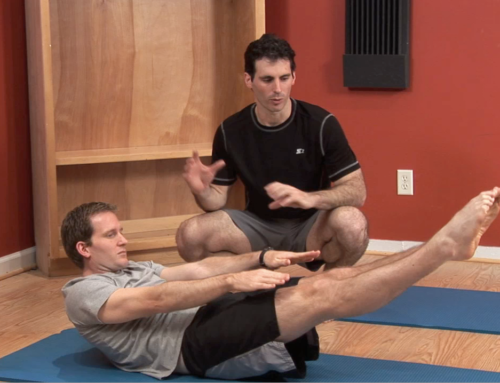
Hollow holds – This is a great exercise for fundamentals as well as strength. Lay on your back. Bring legs up about 8 inches and bring your chest and upper body off the floor where your shoulders are about 6 to 8 in. off the floor.
Squeeze the abs and keep your back rounded. You should be resting on the lower part of your back. Keep your arms straight and glued to your ears. An alternative arm position is extended straight out in front of you. Get to where you can hold them for a minute. Do 3 to 5 sets for as long as possible.
If you can hold for a minute, you will be able to grate cheese on your abs.
Sit Ups – Ah, the good old fashioned sit up. Start out with 50 per workout and work your way up to 200. Cross your arms over your chest so you aren’t tempted to yank on your head to sit up.
Superman Hold and Lifts – Also a great fundamental and strength exercise that will turn you in to a superhero. Lay on your stomach with body straight. Lift the upper body and lower body (arms by your ears) in to an arch position.
Squeeze all muscles, keeping arms and legs straight.
Work up to holding it for a minute. Do 3 to 5 sets of holds. Also start to work repetitions. Go in to the arch position and then come back down. Work up to 50 to 100 reps.
Leg Strength:
Air Squats – Not to be confused with the air guitar. However, if you want to play the air guitar while doing your squats…sorry, I digress. Back to the workout.
Do a deep squat keeping chest up and heels on the floor and feet just slightly wider than shoulder width. Squat lower than 90 degrees. Do 100 reps every workout at first. Increase up to 200 as you get stronger.
Squat Jumps – Once the squats get easy, turn them in to squat jumps. Go in to the normal squat and then explode in to a jump. Work up to 100 reps per workout. They look silly, but who cares, you’re at home. This silly exercise is creating some ultra powerful tumble legs.
Squat tuck jumps – This is the next level of advancement. In your jump, out of the squat, pull your knees up to your chest and hit the tuck by the peak of your jump. 100 reps. These look even sillier, but they are a serious exercise. Now you are working your abs and hip flexors too!
Rapid Jumps – Face a wall and reach up over your head. Place a piece of tape on the wall about 10 inches above your hand. That is your target.
For a minute at a time, rapidly jump over and over, touching your piece of tape.
You should be on the balls of your feet the entire time, punching back in to a jump as soon as your feet hit the floor. This should primarily be a calf workout for you.
2. Fundamentals – You’re getting strong, you’re feeling good. Time for some basics. Many fundamental exercises such as lunges, handstands, bridges, hollows and arches were worked in strength training. This is great! As you are developing strength, you are also working on the very valuable basic elements essential for tumbling. Focus some more of your time on handstand work. Spend at least 15 minutes working on them as mentioned above. Without a solid handstand, all other skills will suffer.
Also put some additional time in to more bridge holds. If you can’t kick up to a handstand against the wall, the bridge work will be great for helping you get comfortable being semi upside down and will develop some shoulder and back strength as well. Keep your legs together and straight. Push your through your feet pushing your shoulders out past your hands.
Once you develop a solid bridge, start holding one leg up and straight. Begin trying to kick over and out of your bridge. Pull through your shoulders, chest and abs.
You should have a good stable handstand and bridge long before you ever have a back handspring.
The cartwheel is an obvious fundamental that needs to be perfect. If you’ve got it, great! Just warm up with a few. If you don’t have it down yet, stretch out a piece of tape on the floor and work on straight line cartwheels over and over until it’s flawless. Place obstacles on your tape to step over and reach over to help stretch out your cartwheel. Again, focus on a proper stretch, lunge and then cartwheel.
3. Stretching – You should strive to stretch every night. Do it as often as you can. Stretch while doing your homework, watching the Vampire Diaries, whenever. Work on all areas of flexibility and put a little extra focus on shoulders, wrists and back. Once again, bridges are great for this.
Many youngsters are naturally flexible but that doesn’t mean you shouldn’t work on it. There are always areas you can improve and it’s also going to prevent you from injuring yourself at some point.
4. Visualization – Don’t laugh. This is often overlooked but I can’t stress how important it is. Find a YouTube video of a particular skill (performed correctly) you are working and study it. Watch it over and over, tattooing it in your brain. After that, close your eyes and picture yourself doing it perfectly, over and over. You should do this daily! I’m not joking here. There are many studies proving how powerful this is so do yourself a solid and give it a go.
That’s it! No matter what level you are, or how well you tumble, these exercises will only benefit you. If you stay dedicated to this for several months, I can promise you, you will be ahead of most of your cheer buddies. Give it a shot. You have nothing to lose and only good things to gain.
If you want to add some training aids for your home, please visit our Cheerleading section.
If you need a fully detailed, full body, 6 month workout plan based upon the sport of gymnastics consider our GymABstics DVD Set. No weights. It just utilizes the body weight with exercises like I described above. If you make it through 6 months, it will no doubt be life changing.
Remember to always train safely!
Brad Thornton
Strength & Fitness – Team Lead
www.GymnasticsStrength.com


Leave A Comment